
Developing Node-RED custom nodes helping notes
Stuck while making a Node-RED custom node?
Been there, done that and after going through a lot of webpages, group posts and documentation I came up with solutions, if not perfect at least workable.
I realize that you might know all this, it might even sound silly to ask such questions, but when I got started, I definitely didn’t know nor was I able to find the answers easily.
This post is meant to give you a helping hand if by any chance you get stuck in a similar situation:
Documentation
First of all, let me say that there is plenty of documentation available, and the Node-RED guys themselves are giving people a helping hand in their google groups. Here is a list of things I found useful:
- Main documentation site for Node-RED in general and custom nodes in particular
Node-RED Docs – Creating Nodes - Official Google Group
- This tutorial Creating the Philips Hue Node
- Node-RED’s Public Trello Board
- Sample Node 99-sample.html
So here are the questions I had to ask myself when creating a custom node to make Blynk app integration with Node-RED.
Logistics
Where do I save the files?
By default, on OSX, Node-RED creates a hidden .node-red folder inside your ~/ user folder. It is there it saves it s settings, flows, libraries and a folder for custom nodes “nodes”. In this nodes dir you could manually install some other nodes that you downloaded or created. To help with separation and to fit my work style I created a “nodes/dev” and in dev I created a symlink to the development copy of my node
blynk -> /Users/user/Documents/Work/Node/node-red-contrib-blynk/
This has a few benefits (for me at least):
– i can browse to it, it’s not in some hidden folder
– i can test as i develop by just restarting node-red
– keeps everything separated and helps a bit with the following two q’s
Alternatively you could specify userDir and/or nodesDir CLI parameters when starting up Node-RED in order to specify the folder you wish to load stuff from.
Do I use source control?
Yes. You should always use source control. Also, assuming that you wish to share your new and shiny node with the community, it would make things a lot easier to use a free github account.
Just add the folder you created earlier as a new project on github and it will remain your working copy. Or use the great SourceTree app. It’s really cool.
How do I share it?
As the docs say, you need to package it as a NPM package. As a convention the package should use the prefix node-red-contrib- . Be nice and follow the convention.
To make your life easier you can run npm init in the node’s folder which will create package.json for you by asking a few questions.
Be sure to add the project’s github url from above, and at least node-red as a keyword. This will make it appear in NodeRED’s Flows page.
After you have a package.json you will need to add a node-red entry to it manually. Here is mine:
{
  "name": "node-red-contrib-blynk",
  "version": "0.0.9",
  "description": "Node Red integration with Blynk App and Server",
  "main": "blynk.js",
  "scripts": {
    "test": "echo \"Error: no test specified\" && exit 1"
  },
  "repository": {
    "type": "git",
    "url": "https://github.com/tzapu/node-red-contrib-blynk.git"
  },
  "keywords": [
    "node-red",
    "blynk"
  ],
  "author": "Alex T <alex@tzapu.com> (https://tzapu.com)",
  "license": "MIT",
  "bugs": {
    "url": "https://github.com/tzapu/node-red-contrib-blynk/issues"
  },
  "homepage": "https://github.com/tzapu/node-red-contrib-blynk",
  "dependencies": {
    "blynk-library": "~0.0.16",
    "path": ""
  },
  "node-red": {
    "nodes": {
        "blynk": "blynk.js"
    }
  }
}
You will also want to pay attention to dependencies bit:
"dependencies": {
    "blynk-library": "~0.0.16",
    "path": ""
  },
This is where you will need to add what other libraries your node is dependent upon. They will get installed together with the node.
To add dependencies when developing your node you can run the following
npm install --save dependency-package
which will both install your dependency and save it to package.json.
Since you are hopefully using source control as per the previous point, be sure to add the node_modules folder to your .gitignore so it does not get added to your git repo.
When done coding and you want to share your node contribution to the world just run
npm publish ./
Development
Providing status events
This is discussed in the documentation here
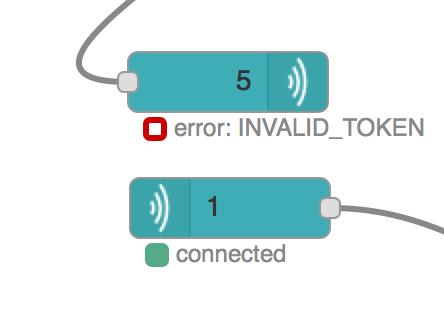
Showing status can be very helpful for the user of the nodes so they can see at a glance if everything is ok or not.
One thing not mentioned in documentation is how you deal with multiple nodes in case you have a single entity that establishes a connection (like the MQTT node).
Statuses are being set per node and if your nodes connect to a server it makes sense to have only one connection using a Configuration Node
What I have done is to just have every node subscribe to the connect/disconnect events of the server (in my config node). That way each node tracks the status of the respective server they are connected to.
node red blynk nodes – 2 different servers
To do this you will most likely need
-keep track/reference of your server in an object/array
-keep reference of a server to node relationship
-subscribe each node to status events on the server so you can update each node individually
If you go down the same route as I did, you will soon find out that when you go above 10 nodes of the same type you will get a warning in node-red’s console:
 (node) warning: possible EventEmitter memory leak detected. 11 connect listeners added.
Use emitter.setMaxListeners() to increase limit.
So far the only solution to this whole events/nodes/single server/status updates ‘issue’ is to just do as it suggests and use emitter.setMaxListeners() to increase limit. emmiter will be your server.
Category: blog